It’s obvious that old pens don’t work as well as newer ones. Take a look at the first fountain pens to be produced and how poor the ink delivery was due to feeds like tongue depressors. Like with any technology it takes a while to reach perfection. Another factor in early pens was that flexible nibs need a lot of ink to make those wide lines when the nib is under pressure. So in the late 19th century you wound up using a pen that would give you a nice ink blob in the middle of a word.
Various methods were attempted to make the better mouse…er…pen trap including some which were half or quarter baked. What is called an “overfeed” was effective enough to have lasted on some pens like Onotos and Swans for nearly 20 years. I won’t go into great detail but what the overfeed does is the same as the underfeed: ink saunters down it to the point from the reservoir. This gives it a double dose of inky goodness needed by super flex nibs.
Swan 4571 slip cap eyedropper with overfeed showing.
I have a great example of this type of setup in an export Swan slip-cap eyedropper you see above. Why I say “export” is that this was sold in France where legally calling something “gold” meant that it had to be 18kt or above in quality. When I removed this nib I saw the text verifying this as well as the word “broad”. I think this is more a stub nib than a broad and with its flex is quite a joy to use.
French Export 18kt Nib.
If you want to see the few parts that go into this simple pen take a gander it during cleaning and restoration. There’s a barrel, a feed, a plug with wire retainer, a nib, the overfeed, and the cap. It’s such a graceful pen in how few bits make it up. Plugs go into holes and in this case it’s an alternative way to fill the pen. You can pull the plug (the Swan will not keel over) and use an eyedropper in that spot. The only confusing thing you might see is the modern addition of an o-ring on the section to seal it better.
Fallen to pieces.
Another interesting fact is that this is an American made Swan. The company that made Swan and other model fountain pens, Mabie Todd & Bard (just Mabie Todd in later years), goes back to the mid-19th century making dip pens and pencils. By the turn of the century they had been making fountain pens for a while and started a British subsidiary. That UK arm really took off and their product was a success while the U.S. sales slowly dropped. The single company became two and parted ways. The U.S. firm closed up shop in the late 1930s while the other advertised itself as “The Pen of the British Empire”.
I’ve never quite seen a pen that can put down a line as wide as this pen does when flexed. When ink runs out in these instances you get “railroad tracks” or a double line since there’s not enough ink to fill the center. So, one can see the odd feed is doing the job. Yay for old tech!
Please bear with me since I’m going to cover a lot of ground in this post. Really, if I wasn’t so lazy I’d make this into three different standalone posts instead of this omnibus one but I can justify running the subjects together since they do link up.
Think Ink
The seed of this post started as an ink review. I hate doing ink reviews since so many people do them better than I with the same inks and usually far earlier. Certainly I could do samples, test drying times, and talk about saturation but there’s no way I could spin it so it wasn’t repetitious. None-the-less I did get two free J. Herbin inks from the great Quo Vadis Blog St. Patrick’s day giveaway this year and I felt it only right that I make mention of them.
The inks were supposed to be some variant on orange and green (the colors of the Irish flag along with white) and so I had to sit down and decide which to ask for. The only green I don’t have from J. Herbin was the Diabolo Menthe and so that choice made itself. Orange provided a different challenge in that I already had the only one available: Orange Indien. Thinking out of the box I did see another ink that has a bit of orange undertones called Ambre de Birmanie. A few weeks later both inks arrived through the good auspices of Karen Doherty at Exaclair.
Without a real plan about how to review them I did do some writing samples with both inks to check them out. Recently I restored an interesting Conklin pencil and pen set which I decided to fill with one of the inks. Most people think of Wahl when metal fountain pens are mentioned since they advertised their line heavily in the early 1920s. However, other manufacturers made similar pens such as the rolled gold ones seen in the picture below. The checked design and proportions are reminiscent of the Wahls with the most noticeable differences being the domed ends and Conklin patent spring clip.
Conklin metal pen set.
After trying the pen with Ambre de Birmanie I was surprised by how much I liked the results. While not super saturated the pleasant color and nice line shading that was displayed is very pleasing. This test led to me noticing the Conklin’s #3 semi-flex nib showed some disturbing ink starvation. Over time I’ve happened across articles that mention that even the flexible old pens of yore were not meant to flex as wide or as long as a calligraphy pen, for example. Still there are some that can maintain a happy ink flow for a good long time. This pen didn’t do that.
Fussing With Flex
I can live with the Conklin’s ink flow since I think it just might be the way it is but it did make me think of another pen I had that was bedeviling me with similar problems. The history of this one is that a year or so ago I found on an old Sheaffer parts pen a nib that was actually flexible. After some trial and error I put together a pen from old parts to give this nib a new home. I called it “Frankenflex”. From the beginning I noticed there wasn’t enough flow and as the nib flexed the ink dried up. I put the project aside and almost forgot about it till I was looking for a pen to try the Diablo Menthe in and saw it laying there. Taking another crack at the pen and seeing if it really was as bad as I remember seemed like a good idea. As you can see from the second writing sample shown later in this post I did not imagine the flow problems. There are many areas where the line separates into two small tracks which are the two tines distanced from each other with no ink flow to fill the middle.
As for the Diablo Menthe ink I don’t quite like it. It’s very light and thin looking even when it shades darker which isn’t endearing. I’ll keep thinking of a good use for it, though, and maybe one the right color paper it will grow on me.
After filling the Frankenflex I decided to get back at trying to make it write correctly. Ink flow has a few different aspects to it including the amount of ink, the viscosity of the ink, and the way the surface tension is maintained. The mechanics behind those include the distance between feed and nib, the size of the ink/air channels, and the shape of the nib slit. There’s a lot more to it than those factors (some good information about this can be found here) but those I mentioned are ones a simple mind like mine can handle. Deciding that widening the channels on the feed was the way to go I went to work.
If you look at the first picture below you’ll see the parts of the pen that do the heavy lifting. On a Sheaffer of this era the feed (A) has a long half-round extension (B) which slides into a hole at the end (which you can see in the next picture). The ink travels up this feed extension into the middle of the feed proper where is gets to the underside of the nib through a slot cut into the topside. It’s a bit more complex than the usual feed you see in fountain pens of this era but still rather straightforward. My goal was to increase the width and depth of the feed channels and the width of the top feed slot. Hopefully by doing this I would increase the flow and supply the nib enough ink to keep it from drying out when flexed to make a thick line.
I used an X-acto knife and some fine sandpaper to attack the job with. Heeding the saying “easy does it” as a guide I only modified a little each time and then put the pen back together to test how it wrote. The third picture in he set above will show you what the feed looked like after I widened it a bit. A series of writing samples seen below show my progress (and frustrations) as I worked along. Test 2 looked like I was making progress and I was happy. However, it still needed improvement so I went back to make more adjustments. The third sample you see looks worse than the second one for no reason I could figure out. Fickle is the fountain pen and its ink feed mechanism! Confused but not beaten I took it all apart again and did more adjusting and widening. Finally we come to the last test and its satisfactory result. There is a lot of improvement in general and it was a nice point to stop before doing more damage than good. Yes, I’m very good at doing damage if not careful.
You may notice I used a different ink in each test and pose the question did that make a difference in flow? I do find that thin inks don’t seem to work as well in flexible pens as ones that are more syrupy. I’ve not done a controlled scientific-y test to see if this is correct and the fact that denser liquids have less capillary action would seem to contradict my observations so I just wind up confused as usual. The picture below shows the Frankenflex nib with the tines widely separated. Between them is a ribbon of ink that when it breaks stops in the ink from making a solid line. The goal of all this was to keep that ink flowing down the gap.
Frankenflex nib flexing.
Padding This Post
There is one more thing I really need to mention before finishing this all up: For the samples I used the new Rhodia Dot Pad which I recently purchased. It’s quickly become my favorite pad style due to the both the pattern and the paper. Rhodia pads always have great fountain pen friendly paper in them and this pad is no exception. The smooth 80g acid-free, pH neutral paper has purple dots in a grid on it which is both useful and discrete. I’m really sold on it.
You’ll also see a lovely roller blotter in the picture below that was purchased for me (I paid him for it, don’t worry) by Rodney, a grand person from the great state of Hawaii. It’s made of the native Koa wood by David Mozdren who runs The WoodJoint (808-294-3283 is the number but no website and I know nothing more of his work). The wood is beautiful and often used in the construction of musical instruments like Ukuleles.
J. Herbin inks, Frankenflex on left, Conklin on right, and Koa wood blotter.
Musical Finish
So, we come to the end of this rambling post with something I thought I’d never mention: Ukuleles. Maybe in the future I’ll fit Zithers or Theremins in somewhere.
The post before last I showed some pictures of a Sheaffer Imperial that I was restoring. I’ve finished it and thought I’d put the pictures of the final product up here with a few comments.
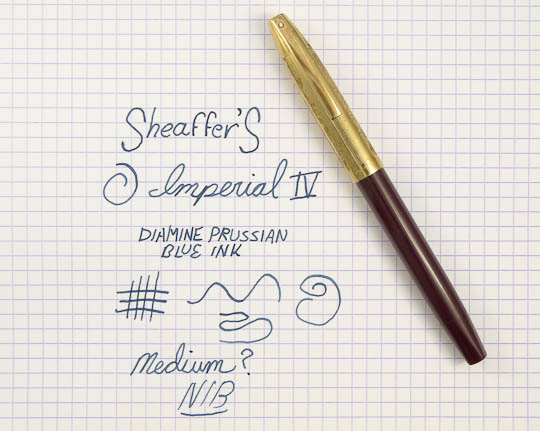
A bit of color and an Imperial IV.
The Imperial has had many versions and a long production run. The one most people think of when hearing the name is what we have here, a Sheaffer Imperial IV. Introduced in 1963 and made till 1968 (with a reintroduction of the basic look and name from 1995 to 1998) some people might say this was the last classic that Sheaffer turned out. You’d probably be more prone to say that if you didn’t like the pen that replaced this one, dubbed the Targa, which was sold for decades. That’s another story.
Made to look like a thinner Pen For Men (PFM) the Imperial has a sleek, attractive design. I’m fond of this model no matter what variation because they write and work well. They were also among the last Sheaffers to have the Touchdown filling system. The years this pen was made pinpoint when the cartridge overtook pens with permanent ink reservoirs. As the cartridge fill Imperial got more popular less and less Touchdowns were made until they disappeared.
Although you can see this example has been used for many years it still works great with no functional problems. It writes a nice smooth medium line and it a pleasure to doodle with. I was going to end this with some pun having to do with empire but I think the post title is bad enough.
A friend sent me a special pen to see if I could get it working again. It belonged to his Godmother and displays her name proudly on the barrel. Oddly enough one of her two surnames was condensed to a single initial which makes it seem like this was either a present or that the stationers who engraved it couldn’t hot stamp that many characters and took a strange shortcut.
The pen is an early Sheaffer Imperial IV with Touchdown filling. Imperials went up to VIII with each increment a slightly fancier pen. They were made as cartridge/converter fillers as well. If you want the whole scoop check out the excellent article at PenHero.com. This one’s section unit seemed pretty gummed up so I decided to take it apart for a thorough cleaning. I’ve got a similar later Imperial section that I disassembled first to make sure I was familiar with the procedure before working on the heirloom pen.
Note markings on early and later shells. (click to see larger)
The first oddity I noticed was the difference in the markings on the nib between the two. My friend’s said “Sheaffer’S” in the style you see on older vintage pens from that manufacturer. My nib just said “Sheaffer” in the block letters I’m used to seeing on those pens from the 60’s and later. A quick web search and I found that the former company logotype was on the first Imperials and it changed over in the mid-60s it seems.
Later shell on left is cutout. One on right is enclosed.
Even odder that the markings was the structural differences I saw. On the newer Imperial section the front of the feed is exposed through a cut-out in the shell. It was what I was used to seeing on this model. However, the older one had the feed totally encased in the section and a small ink intake hole under the point was the only opening I could see. When I took them both apart you could see a larger end on the newer feed and a smaller one to fit inside the outer cover on the other. Not too much else was different except for a shorter feed channel and no joint washer on the earlier pen.
Old section parts on top, new on bottom. (Click to see part labels)
Still, it’s a pretty major running change for a pen and I’m not sure why they did it. It could have been due to problems noticed with ink flow or a problem flushing the older design out easily. The answer might never be known. When this pen is finished I’ll evaluate how it writes and see if it is lacking in some way.
Overall the Imperial is a great, well made pen that is often overlooked. I can’t wait till this one is up and running again.
I’m back at the pens from parts thing with two frankenpens under construction right now. One is a Sheaffer similar to what I’ve done before but the other is a Parker 51. This is the first non-Sheaffer I’ve created and it’s been interesting so far. There are three plastic parts visible and offer a choice of color: The blind cap, barrel, and hood or shell. The one thing about this kind of pen I don’t like is that they all had a metal cap which means no color choice for that part.
The parts of the Parker 51 frankenpen. (click image for labeled parts)
If you’ve noticed how short the barrel looks in the photograph that’s because it’s actually a Parker 51 Demi model. This model was intended for women and has a foreshortened barrel. I’ve always liked them since 51s seem cuter in this diminutive size. The Demi was introduced right on the tail end of the Vacumatic filler’s life and lasted for only a year in this form.
I got the idea to make this pen from a comment someone had made about one of my previous frankys. Since this person inspired me the pen will be traveling out to them when completed. It’s a surprise so I’m not going to give away who the recipient is.
The new pen I’ve been building is finished. Last post you saw the parts and now you can see it all together. By agreement with its owner the pen will be called “Tuckenstein” to represent it being both a frankenpen and a Sheaffer Tuckaway model. The only change I made from when I laid out the parts earlier was to switch the blind cap from blue to green. The blue one was too tight and so I replaced it with a better fitting one. I don’t think it changes the overall look of the pen a great deal.
It wasn’t too hard to do final assembly on this pen except for finding the correct screw to attach the blind cap. I stole a synthetic rubber o-ring from a Sheaffer Imperial which fit well enough to allow the touchdown tube to achieve a good seal when moving up and down inside the barrel. It’s important to have this good seal since in this system of filling a sudden compression of air is achieved by pushing that tube downwards which deflates the sac. That sac will then inflate and in that way draw ink up. Lastly the old spare nib used needed a good amount of smoothing to make it write well.
It may not be something a mere mortal should attempt but another pen has been brought to life!
There’s no way getting around the fact that a lot of vintage pens are made of hard rubber. Before the dawn of plastics it was one of the best materials for the job. Light and strong it’s made when rubber is mixed with sulfur and then cured by heat. Once it’s lathed into a cap and barrel it was often made more esthetically pleasing with heat embossed decoration. Eventually brighter colors, sometimes in patterns, were developed to spruce the “any color you want as long as it’s black” pens up. All those benefits made hard rubber popular for many years until it lost the battle with the early celluloid plastics.
There are negatives as well to hard rubber. One of the worst is that over time the material will discolor to brown or sickly olive green. This is caused by exposure to UV light which oxidizes it as well as exposure to moisture which bonds with free sulfur and creates sulfuric acid on the surface. Either way with time it’s enviable that the surface will sooner or later take on the new and unattractive cast.
It used to be you couldn’t do much for an old pen that wasn’t shiny black anymore but accept it. Buffing the surface exposed undamaged rubber but at the cost of loss of pattern or imprint detail. Black paint lost detail as well by building up a coating on the exterior. If you lucked out and got a mint BHR (black hard rubber) pen you kept it in the dark or used it and took your chances.
Happily a few years ago two methods arrived that promised to restore your drab discolored pens to black beauties. With the process called G-10 a dye is infused into the material and gives it new color. It’s not reversible after application and has to be performed by someone who offers this service. Proponents claim that this makes the newly treated rubber resistant to further damage by blocking UV light and closing the pores in the material against moisture. The other option is Pensbury Manor Black Hard Rubber Pen Potion No. 9 (known from here on out as PMBHRPPNo9) which is a self applied dye. It’s a treatment which is lightly absorbed into the pen’s surface to blacken and protect it in a similar manner to the first process. The coloring can be reversed by using an ammonia/water combination to remove it.
Why are we discussing this? Well, I have a Wahl eyedropper that exhibits a very slight amount of discoloration on one side of the barrel and cap. It was bothering me a bit and since this is not a rare pen I thought I’d finally give re-blackening a try. Since I like to do things myself as well as save money the PMBHRPPNo9 seemed to fit the bill. I ordered it and when it came I decided to first try it on an old heavily discolored pen cap I had in the parts pile. What follows are pictures and text showing this test and the results.
Below is what the PMBHRPPNo9 looks like brushed onto white paper. The washed out look of it doesn’t lead you to believe it will do much to darken the hard rubber.
I used a knock out block and a dowel to hold the cap in an upright position for application and drying (it’s recommended you let the treated parts cure for 8 hours). In the first picture you can see the PMBHRPPNo9, block, brush and untouched cap.
If you look at the close up of the cap you can get an idea of how much it’s turned brown. Before starting you need to clean the parts in an ammonia and water solution so it will be free of oils and other surface contaminants. If you don’t the dye may not bond properly.
Application is as simple as dipping the brush into the solution and applying it in long, even strokes.
After curing I did a little buffing with a cloth to shine up the new surface. In this picture you can see that the section I worked on did indeed get much blacker and shiner.
While not looking exactly “from the factory” fresh, the part of the cap PMBHRPPNo9 was applied to is much more appealing. Of course it’s probably not a good to do this to rare pens where their value might be decreased by messing with the surface. Another thing to consider is that some collectors think any cosmetic changes like this are unacceptable since the natural state of the pen is changed and it could be represented as being in better condition than in actuality. Overall, the process seems like it did not do any damage to the rubber substrate and had very positive visual and tactile result. Not bad if it fits your needs.


